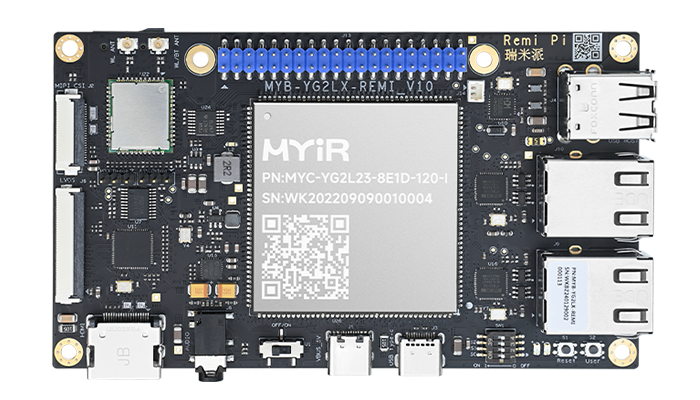
Ubuntu System Porting Guide for Renesas RZ/G2L-based Remi Pi

2024-06-13

1169
1. Overview
Linux system platform has a variety of open source system building frameworks, which facilitate the developer in building and customizing embedded systems. Currently, some of the more common ones include Buildroot, Yocto, OpenEmbedded and so on.
Meanwhile, more traditional desktop systems have also joined the embedded environment system, such as Ubuntu and Debian, to provide more convenient and practical systems for embedded development. This article mainly introduces the complete process of customizing a complete embedded Ubuntu 22.04 system based on Ubuntu 22.04 core and MYIR’s Remi Pi, including the preparation of the development environment, the acquisition and transplantation of Ubuntu 22.04 system, LXDE lightweight desktop management, and so on.
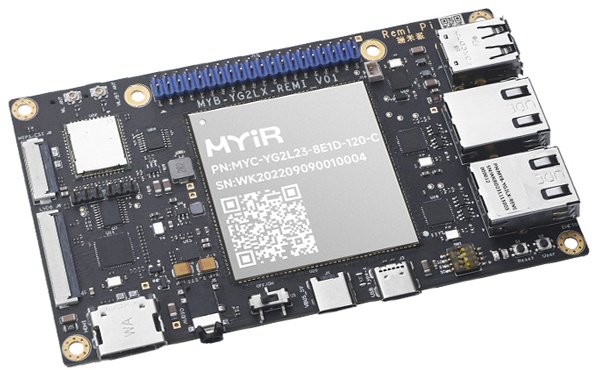
This guide does not cover the introduction of the basic knowledge related to the Linux BSP system, and will directly use the BSP provided by myir-image-full released by MYIR. For more information on how to create BSP files, please refer to the “Remi Pi_Linux Software Developer's Guide”.
1.1 Software Resources
The Ubuntu system used by Remi Pi is based on the ubuntu-base-22.04-base-arm64.tar.gz version (download link below), and adds abundant system resources and other software resources on this basis.
Ubuntu Base 22.04.2 LTS (Jammy Jellyfish)

Note: The login name for the ubuntu system provided by MYIR is: root. Password: 123456
2. Preparation of Development Environment
Based on the Ubuntu base system, some hardware and software environments required in the development process include the essential development host environment, the necessary software tools, and access to code and materials. The specific preparations will be described in detail below.
2.1 Development Host Environment
This section describes how to build a development environment suitable for the Renesas Remi Pi platform, which uses the multi-core heterogeneous RZ/G series processors. The RZ/G2L has dual ARM Cortex-A53 cores. By reading this chapter, you will understand the installation and usage of related hardware tools, software development and debugging tools. And you can quickly set up the related development environment to prepare for subsequent development and debugging.
Host Hardware
The construction of the entire SDK package project has high requirements for the development host, which requires a processor with a dual-core or higher CPU, 8GB or more of memory, and a 100GB hard disk or higher configuration. It can be a PC or server with Linux system installed, or a virtual machine running a Linux system, or WSL2 under a Windows system.
Host Operating System
Usually the installation is chosen to be performed on a local host running a Linux distribution such as Fedora, openSUSE, Debian, Ubuntu, RHEL or CentOS. Here we recommend Ubuntu 22.04 64bit desktop version, and subsequent development will be introduced with this system as an example.
Installation of Required Software Package
Please refer to the “Remi Pi_Linux Software Development Guide” for installation, and only one package will be required for installation here.
PC@system1:~$ sudo apt-get update
PC@system1:~$ sudo apt-get install qemu-user-static
3. Porting the Ubuntu 22.04 File System
3.1 Introduction
Ubuntu-base is the minimum file system officially built by Ubuntu, which includes the Debian package manager. The size of the base package is usually only tens of megabytes, behind which there is the entire ubuntu software repository support. Ubuntu software generally has good stability. Based on Ubuntu-base, Linux software can be installed on demand, with deep customization capabilities, and it is commonly used for embedded rootfs construction.
Several common methods for building embedded file systems include busybox, yocto and buildroot. But Ubuntu offers a convenient and powerful package management system with strong community support, allowing for the installation of new software packages directly through apt-get install. This article describes how to build a complete Ubuntu system based on Ubuntu-base. Ubuntu supports many architectures such as arm, X86, powerpc, ppc, and more. This article is mainly focusing on building a complete ubuntu system based on arm as an example.
3.2 Obtaining the Source Code
We provide two ways to obtain the source code, one is to obtain the zip package directly from the 04-sources folder of MYIR's disk image, and the other is to use wget to obtain the official source code for building. Please choose one of the methods according to your actual needs to perform the building process.
3.2.1 Obtaining Source Code via wget
The details of the procedure are as follows:
PC@system1:~$ sudo wget https://cdimage.ubuntu.com/ubuntu-base/releases/22.04/release/ubuntu-base-22.04-base-arm64.tar.gz
Create rootfs folder, then unzip the downloaded ubuntu-base-22.04-base-arm64.tar.gz zip archive to the rootfs folder: (Please operate according to your actual path and folder)
PC@system1:~$ mkdir rootfs
PC@system1:~$ tar -xf ubuntu-base-22.04.1-base-arm64.tar.gz -C rootfs/
The contents of the unzipped folder are as follows:
PC@system1:~$ tree -d -L 1 rootfs
ubuntu_rootfs
├── bin -> usr/bin
├── boot
├── dev
├── etc
├── home
├── lib -> usr/lib
├── media
├── mnt
├── opt
├── proc
├── root
├── run
├── sbin -> usr/sbin
├── snap
├── srv
├── sys
├── tmp
├── usr
└── var
3.3 Preparing the chroot Environment
3.3.1 Installation of the Emulator
PC@system1:~$ cp /usr/bin/qemu-aarch64-static ./rootfs/usr/bin/
(If the host does not install the qemu-user-static toolkit, you can install the toolkit by entering the following command)
PC@system1:~$ sudo apt install qemu-user-static
Copy the host DNS configuration file to the arm framework Ubuntu filesystem (this must be copied, otherwise the following operations could not be performed).
PC@system1:~$ cp /etc/resolv.conf ./rootfs/etc/resolv.conf
3.3.2 Creating a Mount Script
Copy the following script code into the ch-mount.sh file and change the permissions (777) to executable.
PC@system1:~$ vi ch-mount.sh
#!/bin/bash
function mnt() {
echo "MOUNTING"
sudo mount -t proc /proc ${2}proc
sudo mount -t sysfs /sys ${2}sys
sudo mount -o bind /dev ${2}dev
sudo mount -o bind /dev/pts ${2}dev/pts
sudo chroot ${2}
}
function umnt(){
echo "UNMOUNTING"
sudo umount ${2}proc
sudo umount ${2}sys
sudo umount ${2}dev/pts
sudo umount ${2}dev
}
if [ "$1" == "-m" ] && [ -n "$2" ] ;
then
mnt $1 $2
elif [ "$1" == "-u" ] && [ -n "$2" ];
then
umnt $1 $2
else
echo ""
echo "Either 1'st, 2'nd or bothparameters were missing"
echo ""
echo "1'st parameter can be one ofthese: -m(mount) OR -u(umount)"
echo "2'nd parameter is the full pathof rootfs directory(with trailing '/')"
echo ""
echo "For example: ch-mount -m/media/sdcard/"
echo ""
echo 1st parameter : ${1}
echo 2nd parameter : ${2}
fi
3.4 Installation Package Files
3.4.1 Mounting System
First mount the ubuntu filesystem using ch-mount.sh.
PC@system1:~$ ./ch-mount.sh -m ./rootfs/
MOUNTING
root@system1:/#
root@system1:/# ls
bin dev home media opt root sbin sys usr
boot etc lib mnt proc run srv tmp var
After successful mounting, you can configure the ubuntu filesystem and install some necessary software.
3.4.2 Basic Package Installation
Please install the following packages according to your requirements, and it is recommended to install all of them. (Please install them in order to avoid errors during installation)
root@system1:/# chmod 777 /tmp (to avoid failures when updating)
root@system1:/# apt update
root@system1:/# apt-get install language-pack-zh-hant language-pack-zh-hans
root@system1:/# apt install language-pack-en-base
root@system1:/# apt install dialog rsyslog
root@system1:/# apt install systemd avahi-daemon avahi-utils udhcpc ssh (Required installation)
root@system1:/# apt install sudo
root@system1:/# apt install vim
root@system1:/# apt install net-tools
root@system1:/# apt install ethtool
root@system1:/# apt install ifupdown
root@system1:/# apt install iputils-ping
root@system1:/# apt install htop
root@system1:/# apt install lrzsz
root@system1:/# apt install gpiod
root@system1:/# apt install wpasupplicant
root@system1:/# apt install kmod
root@system1:/# apt install iw
root@system1:/# apt install usbutils
root@system1:/# apt install memtester
root@system1:/# apt install alsa-utils
root@system1:/# apt install ufw
root@system1:/# apt install psmisc
Adding log, users debugging ubuntu system
root@system1:/# touch /var/log/rsyslog
root@system1:/# chown syslog:adm /var/log/rsyslog
root@system1:/# chmod 666 /var/log/rsyslog
root@system1:/# systemctl unmask rsyslog
root@system1:/# systemctl enable rsyslog
Installation of Network and Language Package Support
root@system1:/# apt-get install synaptic
root@system1:/# apt-get install rfkill
root@system1:/# apt-get install network-manager
root@system1:/# apt install -y --force-yes --no-install-recommends fonts-wqy-microhei
root@system1:/# apt install -y --force-yes --no-install-recommends ttf-wqy-zenhei
3.4.3 Installation of Desktop System
Installation of LXDE Desktop System
root@system1:/# apt-get install xinit
root@system1:/# apt-get install lxde
Installation of Browser and Audio
root@system1:/# sudo apt install epiphany-browser
root@system1:/# sudo apt install xine-ui
3.4.4 Create User
Set root password: 123456
root@system1:/# passwd root
Enter new UNIX password:
Retype new UNIX password:
passwd: password updated successfully
Removable root user password login
root@system1:/# passwd -d root
Be sure to execute the following command, or you will sudo error
sudo: /usr/bin/sudo must be owned by uid 0 and have the setuid bit set
root@system1:/# chown root:root /usr/bin/sudo
root@system1:/# chmod 4755 /usr/bin/sudo
Create a username: myir
Password: 123456
root@system1:/# adduser myir
perl: warning: Setting locale failed.
perl: warning: Please check that your locale settings:
LANGUAGE = (unset),
LC_ALL = (unset),
LC_TIME = "zh_CN.UTF-8",
LC_IDENTIFICATION = "zh_CN.UTF-8",
LC_TELEPHONE = "zh_CN.UTF-8",
LC_NUMERIC = "zh_CN.UTF-8",
LC_ADDRESS = "zh_CN.UTF-8",
LC_NAME = "zh_CN.UTF-8",
LC_MONETARY = "zh_CN.UTF-8",
LC_PAPER = "zh_CN.UTF-8",
LC_MEASUREMENT = "zh_CN.UTF-8",
LANG = "zh_CN.UTF-8"
are supported and installed on your system.
perl: warning: Falling back to the standard locale ("C").
Adding user `myir' ...
Adding new group `myir' (1000) ...
Adding new user `myir' (1000) with group `myir' ...
Creating home directory `/home/myir' ...
Copying files from `/etc/skel' ...
Enter new UNIX password:
Retype new UNIX password:
passwd: password updated successfully
Changing the user information for myir
Enter the new value, or press ENTER for the default
Full Name [ ]: cy
Room Number [ ]: 604
Work Phone [ ]:
Home Phone [ ]:
Other [ ]:
Is the information correct? [Y/n] y
Setting Up Permissions
sudo vi /etc/sudoers
root ALL=(ALL:ALL) ALL
myir (Add according to your own username) ALL=(ALL:ALL) ALL
When adding the user above, the warning that appears in the middle can be used with the following command:
root@system1:/# export LC_ALL=C
3.4.5 Other Configurations
Set hosts and hostname, add 127.0.0.1 myir
root@system1:/# vi /etc/hosts
Clear the content of the hostname file, add myir (according to the actual user name to add)
root@system1:/# vi /etc/hostname
Modify the passwd file
root@system1:/# vi /etc/passwd
Find this line: _apt:x:100:65534::/nonexistent:/usr/sbin/nologin
Change to: _apt:x:0:65534::/nonexistent:/usr/sbin/nologin
Create the link file (be sure to execute it, or it will report an error when executing the binary executable program)
root@system1:/# ln -s /lib /lib64
Configure the NIC interface, add the following contents
root@system1:/# vi /etc/network/interfaces
auto eth0
iface eth0 inet dhcp
3.4.6 Uninstallation of the System
You can uninstall the system after the above steps are completed. Type exit directly into the system to exit the system and use the command to uninstall.
root@system1:/# exit
Exit
PC@system1:~$
PC@system1:~$ ./ch-mount.sh -u ubuntu-rootfs/
UNMOUNTING
The ubuntu file system is now configured.
3.5 Packaging for Ubuntu System
3.5.1 Creating ext4 Format Files
According to the above procedures, we have already created the ubuntu-rootfs file system, and now we need to create it into a .ext4 file, which can be used to flash to the development board.
PC@system1:~$ dd if=/dev/zero of=ubuntu22.04.ext4 bs=1M count=3300
Please decide the size according to the actual situation, here is an example of 3.3G size.
PC@system1:~$ mkfs.ext4 ubuntu22.04.ext4
Create a temporary folder temp, then mount the ubuntu22.04.ext4 file
PC@system1:~$ mkdir temp
PC@system1:~$ sudo mount ubuntu22.04.ext4 temp
Copy the contents of the ubuntu-rootfs folder to the mounted filesystem and unmount it.
PC@system1:~$ sudo cp -avrf ubuntu-rootfs/* temp
PC@system1:~$ sudo umount temp
3.5.2 Creating SD Boot Images
First, extract RemiPi_SDUpdate.tar.bz2 from the 03_Tools/myir tools folder of the downloaded resources to the virtual machine (users should extract it according to your actual situation)
PC@system1:~$ tar -xf RemiPi_SDUpdate.tar.bz2
PC@system1:~$ cd RemiPi_SDUpdate/renesas-sd
PC@system1:~/RemiPi_SDUpdate/renesas-sd$ ls
image README.md rzg2_bsp_scripts fat16 output rootfs
Replace the packaged ubuntu 22.04 filesystem into the rootfs/home/root/g2l_images folder
PC@system1:~/RemiPi_SDUpdate/renesas-sd/rootfs/home/root/g2l_images$ tree -L 1
├── DDR_1G
├── Image
├── Manifest
├── mys-rzg2l-sdcard.dtb
├── mys-rzg2l-wifi.dtb
└── ubuntu22.04.ext4
1 directory, 5 files
Modify the Manifest file
PC@system1:~/RemiPi_SDUpdate/renesas-sd/rootfs/home/root/g2l_images$ cat Manifest
bl2file="bl2_bp-myir-remi-1g_pmic.bin"
fipfile="fip-myir-remi-1g_pmic.bin"
imagefile="Image"
dtbfile="*.dtb"
rootfsfile="ubuntu22.04.ext4"
ledname="162"
Modify the configuration of your actual path, please refer to chapter 4.3 of Remi Pi_Linux Software Development Guide to modify the myir_config.ini configuration file, and change the path in it to your actual path.
Finally, you can enter the following folder and execute the script to make the image.
PC@system1:~/RemiPi_SDUpdate/renesas-sd$ cd rzg2_bsp_scripts/image_creator/
PC@system1: ~/RemiPi_SDUpdate/renesas-sd/rzg2_bsp_scripts/image_creator$ ./create_image.sh myir_config.ini
Please refer to chapter 4.2 in Remi Pi_Linux Software Development Guide for the burning procedure.
4. Learn about LXDE
4.1 Introduction of LXDE
LXDE is a lightweight and rapid desktop environment. It is designed to be user-friendly and take up few resources while keeping resource usage low.LXDE uses less memory and CPU to present as feature-rich desktop environment as possible. Unlike other desktop environments, LXDE strives to be a modular desktop environment so that each component can be used independently. This allows porting LXDE to different distributions and platforms more easily.
LXDE contains several core components that can be used in desktop environments to manage the entire system resources. The main components are listed below:
- LXPanel: This is LXDE's panel system, similar to GNOME's GNOME Panel or KDE's Kicker. it provides rapid access to
applications, system tools, folders and the clipboard.
- LXSession: This is the LXDE session manager, which is responsible for starting and terminating the LXDE desktop
environment.
- LXDE-OpenBox: This is a window editor that provides window layout and navigation.LXDE uses OpenBox as its default
window editor.
- PCManFM: This is a lightweight file editor that provides file and folder browsing, copying, moving, deleting, etc.
In addition to these core components, LXDE has some other auxiliary tools, such as LXAppearance (for changing themes and logos), LXTask (task manager) and so on.
4.2 Startup LXDE
After booting up, you can log in manually by entering the password 123456, or by executing the (startx /usr/bin/lxsession -s LXDE &) command at the serial terminal, as shown in Figure 4-1:
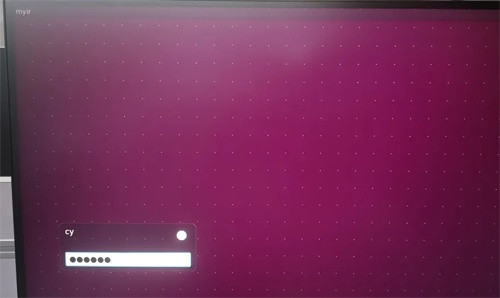
Figure 4-1
After logging in successfully, since the default background is black, you can select the background image by clicking the right mouse button and then selecting.
Desktop Preferences->Appearance->Wallpaper(/usr/share/lxde/wallpapers/lxde_blue.jpg), as in Figure 4-2:
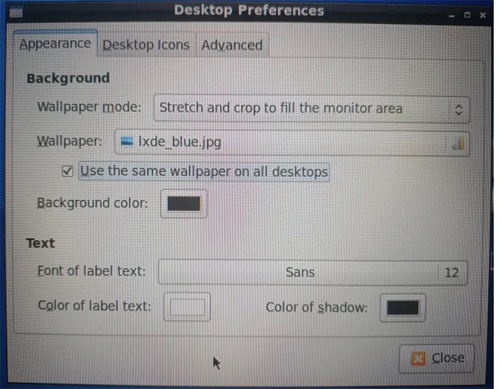
Figure 4-2
The background image is modified successfully, as in Figure 4-3:

Figure 4-3
5. Reference Information
- Linux kernel open source community
https://www.kernel.org/
- Ubuntu
http://cdimage.ubuntu.com/ubuntu-base/releases/18.04.5/release/
- freedesktop
https://www.freedesktop.org/wiki/
- MYIR Remi Pi
https://en.myir.cn/d/RemiPi/88.html
2024-09-23
Ethernet Driver Porting Guide Based on MYIR's NXP i.MX.93 Development Board
Ethernet Driver Porting Guide Based on MYIR's NXP i.MX.93 Development Board MYD-LMX9X
2024-08-16
QT Development Guide for NXP i.MX 93 Development Board by MYIR
1. OverviewQt is a cross-platform graphical application development framework that is applied to devices and platforms of different sizes, while providing different license versions for users to choos
2024-06-16
Application Notes | Setting up OTA Functionality on MYIR's NXP i.MX 93 Development Board
1. OverviewOver-the-Air Technology (OTA) is a technology that enables remote management of mobile terminal equipment and SIM card data via the air interface of mobile communication. In this article, O
2024-05-22
Boosting the Power Industry: Notes on Porting the IEC61850 Protocol to the MYD-YF13X
Part 1: OverviewIEC 61850 is an international standard for communication systems in Substation Automation Systems (SAS) and management of Decentralized Energy Resources (DER). Through the implementati
2023-12-07
Developing AIGC using DNN through MYIR's Renesas RZ/G2L based Board
This evaluation report is provided by developer "ALSET" from MYIR’s forum. This article will introduce how to develop AIGC image using Deep Neural Networks (DNN) through MYIR’s Renesas RZ/G2
2023-10-31
How to Select MYIR's STM32MP1 based SOMs?
Choosing a suitable processor is a difficult problem that every engineer may face in the early stage of development. How do you choose a processor that fits into product development? Today, we will an
2023-10-18
Bring up the STM32MP135x - ST Training Course based on MYD-YF13X (Ⅲ)
This article will take MYIR’s MYD-YF13X and STM32MP135F-DK as examples, and continue to explain how to use STM32CubeMX combined with the developer package to implement the booting of the minimal syste
2023-09-26
Bring up the STM32MP135x - ST Training Course based on MYD-YF13X (II)
This article will take MYIR’s MYD-YF13X and STM32MP135F-DK as examples, and continue to explain how to use STM32CubeMX combined with the developer package to implement the booting of the minimal syste
2023-09-21
Take Great Advantages of SemiDrive's Super Powerful D9-Pro Processor
MYIR has launched the MYC-JD9360 System-On-Module and MYD-JD9360 development board based on SemiDrive’s D9-Pro processor in August. The D9-Pro is a super powerful MPU with six Arm Cortex-A55 cores (up


